Showing posts with label FRUGAL FRIDAYS. Show all posts

Friday, February 27, 2015

Upcycle!! Feed Bag Tutorial


FROM JOANNE: My friend "MaryLu" is a super crafty/creative woman and really good with the sewing machine. I saw this post over on her blog and thought it would be nice as a 'Frugal Friday' post (it's been a while since I've done one of those!). So here it is ... "MaryLu" turns a feed sack into a bag (looks like it would be good for groceries or farmers market). If you make one, please share! Now, let's see how this is done:
 
I love upcycling and using what would ordinarily be thrown away toward a good and useful purpose. Plus, chickens and bunnies are cute. So why not tote them with you to the grocery store?
 
 Start with a 40-50 pound sack of feed.  Feed the critters first and shake out all the extra feed.  Some feeds are sweet and sort of sticky, so you may need to wash out the bag.
 Using a roller cutter and a mat, cut the bottom, closed edge off straight.  
You can also use a box knife to cut it, or draw a line with a pen and use scissors.  A roller cutter will be infinitely easier.
 Then, using a ruler, cut off a 2.5" strip across the bottom of the bag, this will be one handle.
 
 Now move your ruler and cut another 2.5" strip for the other handle.
 
Turn the bag over and thinking about where you want the design to be, cut about 2 inches above that line, so you can hem the top of the bag.  I chose to hem right above the words, "Nature Wise" for my bag.
 
Now, measuring from the top of the bag down about 20 inches, cut across the bottom of the bag at that mark,  
making sure you are cutting at a perpendicular angle so your bag remains square.
 Cut straight across the bottom.
 Take the handle pieces, and cut apart at the inside seam. Cut on both sides of the glued portion and discard that piece.
Set your machine on a wide zig-zag setting. For my machine, it looks like this. width is 5.0, length is 3.0.
 Fold both sides of the handle piece toward the center, overlapping both edges about a half an inch.  Your handle should be about 3/4' wide.
 Stitch right down the center of the handle catching both raw edges under your stitching.
 Stitch down both handles, folding the edges in as you go.
 
 
 Two handles done! We'll cut them to length a little bit later.
 Now fold your bag inside out.  It is a giant tube right now.  We are going to sew the bottom closed.
 Fold out the natural tucks/pleats in the sides of the bag, we will make boxed corners in a minute. 
 Set your machine back to a straight stitch, and sew the bottom of the bag using a half-inch seam allowance, backstitching at both ends. Pinning this "material" isn't easy unless you have strong pins, or you can use some clothes pins to hold the bottom edge in place.  Or you can just "wing in" like the chickens do.
 For this step, we are going to do a bit of origami, or think back to those newspaper hats everyone used to make.  Fold the bottom of the bag up against the side fold and press it with your fingers. 
 Flip it over so the seam side is down and notice the folded lines where the bag sides are.
 We are going to connect the ends of those fold lines and mark across them making a triangle.
 Sew along that triangle-marked line. Back stitching at both ends.
 Now move to the other side of the bag and fold the corner again. 
 Paying attention to the direction the bottom seam folds, make it fold one direction. Mine folds to the left.
 
 
Now, flip the bag over and mark that line again like you did on the other side. stitch across, back stitching both ends.
 
 Fold your bag right side out, and gently push the corners out forming a box.
 
At the top of the bag, fold the edge down about 3/4" and finger press.
 
 Fold again, to make a double fold.  It should be just under an inch.
 
 Stitch this down, close to the folded edge.  If you have the option to use a "needle down" position, now is a good time to use it. The bag gets cumbersome.
 
 You can use clips like this or clothespins to hold the folded edge while you stitch.
 
Since the bag is so bulky, I usually "tent" the end of my machine with the bag.
 
Take the bag out of the machine and refold the pleat at the side.
 
 Now we will attach the handles.  Mark in from the outside edge a comfortable distance, 3-4 inches and make a small circle on the inside hemmed edge of the front and the back of the bag. 
 
 Repeat on the other side, using the same measurement. I did 4 inches, but I think 3 might be better.
 
 Cut your handles at about 24 inches,
 
and using a straight stich, sew the handles to the inside of the bag using a large X.
There you have it! A new tote bag to carry to the feed store, maybe you can bring home a new bunny inside.
 

Friday, August 22, 2014

Old Schoolhouse Free Digital Planners

There is a coupon right now where you can get all of The Old Schoolhouse's digital homeschool planners for free. I just did it and it works ... though I had to register with two different places (the place that the coupon goes through [educents] and The Old Schoolhouse). I'm not sure but they might start bombarding me with junk email and junk snail mail; I guess time will tell.

Here is the coupon if you are interested:
OLD SCHOOLHOUSE FREE DIGITAL HOMESCHOOL PLANNERS
It's good for 8 more days I think. Just go to the link and follow the instructions. An email will be sent to you with links to all the digital planners (5 total). You have to add each one to your cart and then enter the coupon code.

I have downloaded them all but have only browsed through the highschool one (they offer primary, middle, highschool, special needs and schoolhouse planners). The highschool one is a 401 page pdf with a TON of stuff in it, including 'must know' lists like science, math, English and other subject info, bible stuff, and more. Calenders, blank forms/sheets (like goals, to-do, assignments, hour tracking, community service log, etc), address book and so much more.

The "Schoolhouse Planner" is a zip file containing all sorts of things relating to homeschooling and housekeeping ... however I have not looked at it yet!

I hope this is of use to someone. Have a great day!

Friday, June 20, 2014

2014 Garden Update

Well, things are going along nicely for our little garden this year. I probably mentioned before that we were not going to have a country garden this year but instead do only what I think I can handle by myself ... and if someone helps, great! But if not, I can still take care of it alone. This has worked out wonderfully ... and usually I have some help too ;) Here are a few photos, more for my records than anything else!

Oh yes, and on a side note, Tylor did plant some corn and blue lake bush beans at the Sarcoxie Nursery ... so I guess we do have a little bit of a 'country garden' this year, though I am not sure how that's going. I'll try to get over there to take a photo soon, or see if someone else can.

We have no easy access to water at our garden because it is so far away from our house ... there is a road and the church in between the garden and our home. We've been filling up 5 gallon buckets and using the wheel barrel to transport the water, but those days are over now thanks to Corban's rig. He attached a spigot to this old barrel with the top cut off and then put the barrel on his lawn mower. This morning was our first time using it and we were so thankful for it :)
watering rig

cucs and zucchini

herbs - dill, cilantro and basil

jalapeno and cayenne peppers

sweet peppers of various kinds

pole beans

one of our potato beds

one of our tomato beds

Here is a photo looking from the garden to the church (The Church of Monett) ... those are our peach trees that are not producing fruit this year due to a late frost. We tried to save them but I guess our efforts did not work. Oh well! One of the apple trees in front has a lot of little apples on it though :)

Here I doctored up the above photo ... maybe we'll put it on the church website?

Have a great day!

Friday, May 16, 2014

Frugal Friday: Leftover Makeovers


Just a few thoughts to share here on making-over left-overs.

First a tip: never be afraid to experiment!

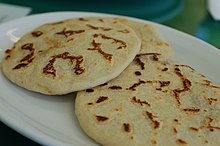
not mine but similar; I forgot to take a photo
I am always up for something new and if I like it I will try to duplicate it at home. For instance, a brother here introduced me to a Salvadoran food called pupusas. Pupusas are basically corn tortillas stuffed with either beans, cheese or meat ... just one ingredient, or two, or three. Low-cost, could be dairy free, are gluten free, could be vegetarian ... so versatile! A fermented cabbage dish called curtido and a smooth [blended] red sauce for dipping (salsa roja) are commonly served with the pupusas. There is a nice little Salvadoran restaurant in Rogers, AR that I've been to a few times. They serve both for really cheap ... a few dollars will fill you up. (Pupuseria Salvadorena #1 on Walnut Street by Aldi's for those who are interested!) YUM! Not only are they cheap but they taste good and I knew I could make my own at home with much healthier results.

I purchased some Bob's Red Mill Masa Harina from Azure Standard, looked up a few recipes online and then last monday we had a 'Salvadoran food night'. Homemade versions of pupusas [two options with or without dairy cheese] with salsa roja, cortido, platanos fritos (fried plantains), and some generic 'Salvadoran rice recipe' I found online. The results were delicious! I made too much (on purpose) so here is what I did with the left-overs.

The next day the 4 young men / men we feed lunch to had this packed in their boxes.

The day after that I was hankering for what I call 'Oriental noodle soup'. I gently stir-fried some of the curtido with sliced mushrooms and green onions. I also roasted some sesame seeds and cooked some Japanese noodles I got at the Asian Market in Omaha a few weeks ago. (Great store!) When all was ready I combined them and added Braggs, garlic, ginger and sesame oil. A delicious combination in my opinion. Usually I throw in raw spinach at the end and also put in raw broccoli with the cabbage and carrots and mushrooms ... however this time I was in a hurry and just wanted to eat ... and there was no room left in our bowls for the spinach :)

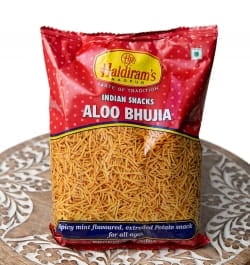
And now this morning we finished the rest of the rice and curtido ... I heated them together in a frying pan with a little olive oil and added some eggs. I guess this would kind of be like 'fried rice' but not really ;) It was very yummy topped with our favourite Indian junk food: Aloo Bhujia (spicy potato noodles ... fried ... certainly not healthy but tasty in moderation). Here is the exact brand we purchased last time, however we are not brand loyal. These were pretty good though and was just the right addition to our breakfast fried rice. 

So there you have it ... several meals made from one. What was interesting to me about these meals is that the flavors changed quite a bit ... from Latin American to Oriental-ish to Indian-ish ... from supper to lunch to breakfast ... and it all tasted great. Also, these were all vegetarian if you consider eggs part of a vegetarian diet. They were all gluten-free and most were dairy free too.  

Some times we just have a 'left-over buffet' where I get out all the left-overs, heat whatever needs heated and then let everyone choose what they want. Sometimes we have what I call 'left-over extravaganza' where I take all the leftovers, combine them in one pot, add some seasonings that seem appropriate and call it a meal. These usually turn out really good however it's impossible to get an exact recipe for it if it turns out really good!

Have fun! Don't be afraid to experiment!