Showing posts with label Do-it-yourself. Show all posts

Wednesday, August 5, 2015

D.I.Y. Homemade Tomato Powder


This year I have decided to focus more on dehydrating instead of canning. I have learned that dehydrating tomatoes instead of canning them is better (for me anyway) in many ways. Let me list some of them.
  • It takes up a LOT less space in the pantry (one quart jar of dehydrated tomato powder holds well over 20 pounds of tomatoes, maybe 25-30 pounds)
  • It is more shelf-stable if done properly
  • No heavy pots or hot jars to maneuver around
  • It takes much less prep and work time; most of the process is simply waiting for them to dehydrate
  • It does not heat up the house or put a bunch of extra humidity into the air
  • It's easier to use (in my opinion)
  • It can be done a little each day
I'm sure there are more benefits, but those should give you a good enough idea as to why I prefer this over canning. Really though it all comes down to the fact that it is something I can do myself, even with my physical limitations. This has been a major blessing to our food storage efforts! All of these fresh, ripe, organic, heirloom tomatoes are sitting on our shelf in powder form, waiting to be used, and the effort was minimal.

The process is simple. The photo above has the steps in order:
  •  Slice the fresh, ripe tomatoes 1/4" thick (I used my nifty Borner V-Slicer Mandoline purchased from Amazon - LOVE IT!)
  • Place onto the dehydrator tray, do not overlap. Dehydrate at 135* until dry (tomatoes will be slightly leathery but obviously dry). Some say to squish out the seeds and juicy middles but I say leave them in! It will take longer but why waste the nutrition these things provide? The type of tomato will have an effect on the drying time. For instance, a roma tomato (which is a paste variety) will dry much quicker than a juicy beefsteak tomato. Plan on at least 8-10 hours but probably longer for the juicy kinds ... and even longer if you leave all the seeds and juicy pulp in.
  • Remove from trays and pack into a coffee grinder or blender. I found the coffee grinder worked better and I think that's because I was able to pick the grinder up and shake it while it was on. If you use a coffee grinder you will have to grind in batches.
  • Funnel the powder into a mason jar. When it is full, add a 100cc oxygen absorber and vacuum seal it with a Food Saver mason-jar attachment. Add the jar ring.
  • Write the date and the jar number. Store in your pantry.
So far I have 4 full quart jars with a lot more on the way. So simple and rewarding!!

To make tomato sauce, whisk a few tablespoons of powder with a cup of water (or paste - use half the water). Now with that you can make so many things ... add basil, garlic powder, onion powder, salt and a little sugar for spaghetti sauce. Add oregano, onion, garlic and salt for pizza sauce. Or whatever other tomato-based sauce you like :)
You can also add this to soups, stews, homemade bread, popcorn, etc. There are so many possibilities.

Wednesday, February 25, 2015

DIY Homemade Airlock for Fermenting


Not too long ago a commenter on my Easy Lacto-Fermented Carrots video asked why I did not use airlocks. My only reason was that I thought they were too expensive but I hoped to own at least one some day, money permitting. After some research however it seems using an airlock produces a truer ferment and is sure to keep out unwanted, air-born bacteria and yeasts which might contaminate your batch. Though I've never had a problem with the latter, I was still curious of the benefits so I asked said commenter if he had any suggestions. He said he made his own quite cheaply ... and of course that got my wheels turning ... and I am now the owner of 6 airlocks for way less money than what I ever thought possible.

Here's how I did it.


I purchased the individual components needed from Amazon. I will link them here but I'm sure sooner or later the supplier will run out, the links will be changed or whatever. If you notice a link does not work, please let me know and I'll try to find another one.

3 Piece Plastic Airlock (pack of 6) $8.41
12 GROMMETS BPA-free Food Grade Silicone for Fermenting in Mason Jars $7.17+$2.20 shipping (there was a shipping discount for ordering this and the next product from the same seller)
12 STOPPERS #000 3/8" BPA-free Food Grade Silicone $7.17+$2.19 shipping (NOT needed but handy)
 
Supplies already on hand:
Drill with 5/8" bit
Wide-mouth Tattler lids and rubbers
Wide-mouth rings
Wide-mouth mason jars of various sizes (1/2pt, pt, qt and 1/2gal)

Note: if you do not have Tattler lids the normal metal lid may be used however an alternative that can usually be purchased at a local store is the plastic "Ball Storage Caps" ... but they are NOT air tight so you WILL NEED a rubber gasket of some kind.

Tattler lids can be purchased from their website or on Amazon (or other places too I'm sure).
Ball storage caps can be purchased from the local store or Amazon (or other places too I'm sure).
Rubber gaskets (reusable silicone seals for mason jars) to use with the Ball storage caps can be purchased on Amazon (or other places too I'm sure). Or you may use a Tattler rubber.
These nifty reCAPs should work too ... I found them on Amazon. They look exactly like what is used in this video. This would eliminate the need for the drill, the bit and also the [optional] stopper and rubber/silicone gasket.

Corban drilled a 5/8" hole into each Tattle lid and then the 3-piece airlock was inserted until the tip came through the other end snuggly.

Now I have airlocks for any size wide-mouth mason jar ... half gallons for things we eat more of (like sauerkraut, curtido, or carrots) and 1/2pt jars for things we either do not need much of or for experiments. Yay!

First up: Beet Kvass (be watching for a post in the near future!) and Carrots. Yum.

Friday, September 12, 2014

D. I. Y. Homemade Deodorant that actually works


 After years of trying without results that pleased me well enough I am happy to report that I have finally developed a homemade deodorant that actually works.

Last spring I compared various homemade deodorant recipes, read about others successes and failures, and then developed what I thought would be the best formula. I wanted to do a post soon after using it but decided it would be best to try it out all summer long - the hottest time of the year and the best way to know if a deodorant actually works.

It is by far the BEST natural deodorant I've ever used ... MUCH BETTER than any natural deodorant from the store or online.

I purchased new, empty deodorant containers online but I also thought it would be nice to have a travel size deodorant for my backpack, so I purchased a travel size antiperspirant and attempted to wash it out. HORRIBLE MISTAKE. The junk never did fully come out, even with lots of dish soap and scrubbing, and what's worse, I smelled like the stuff for days. No thank you. I settled for a 4oz mason jar for my backpack.

This deodorant stayed solid until it got super hot. We do not have central a/c and our bathroom gets really warm. It was no problem for me though, I just used my finger and (to my surprise) actually preferred that way of applying it. I did adjust the beeswax amount in the recipe below - that should add a little more 'solidness' to it for the warmer months. If however you are concerned, just keep it in your fridge.

This is enough to fill 5 containers with a little extra (of course the size of the containers you get will make a difference on your yield. I used THESE containers).

Ingredients
180g baking soda
168g coconut oil
64g arrowroot
56g shea butter
45g beeswax
40 drops tea tree e.o.*
20 drops sage e.o.
20 drops rosemary e.o.
12 drops lavender e.o.
8 drops lemon e.o.
1/2t vitamin e oil (or about 4 caps)

* I chose the other essential oils based on their beneficial properties as well, however you may not have them all on hand. If this is the case and you are only able to afford one e.o., go with tea tree. Among other things, tea tree essential oil is antibacterial, antifungal, antimicrobial, and is a deodorant. Some of the other oils have some of these properties as well, but tea tree has them all.

You might be wondering where to get all of these ingredients? I can tell you where I got mine, however you might have better options available in your area. I purchase from Rose Mountain Herbs (in this recipe, the shea butter), Azure Standard (baking soda, arrowroot, lemon, sage), Vitacost (tea tree and lavender), Costco (coconut oil), and Amazon (vitamin e and rosemary). We harvest our own beeswax.

Directions
The first thing you'll want to do is assemble all of your ingredients.


Next, weigh them out, putting the solid fats and wax together into a glass, heat-safe dish (such as Pyrex brand) or a double boiler. I do not have a double boiler, so I put my pyrex dish on top of a large mason jar ring in a pan of water. This elevates the dish enough and acts as a homemade 'double boiler' in a pinch. I've read in several places that microwaves may also be used, however we do not have one (nor do we want one).


Weigh the dry ingredients together and combine the essential oils and vitamin e into a smaller bowl or ramekin. Set aside until ready to use.

Now the next task is a bit tedious but once it gets going it goes rather quickly, so be careful! Gently stir your hard fats/wax in the double boiler/glass dish over steaming water (medium heat or so), until the wax and fats are melted. I started with just the shea butter and beeswax and added the coconut oil later since it was already liquid (it was pretty warm in my house).


The shea butter will melt before the beeswax. My beeswax is solid; you might purchase beeswax that is in little 'pebbles' called pastilles or pellets. These will melt much quicker than a solid chunk!


Once everything is melted and well combined, add the dry ingredients and mix well till thoroughly combined.


Allow this to cool a bit before adding the essential oil / vitamin e blend - you do not want to harm the beneficial properties of the essential oils with too much heat. Whisk these final ingredients in and pour into your chosen deodorant container. This will cool quickly,


Allow to cool completely before using (it's best to let it sit over night to be sure it's totally set). Store finished deodorant in a cool, dark place. If your home is warm, you may prefer to store in the refrigerator.

Sunday, April 1, 2012

Do it yourself

Part of being a frugal person is being willing to try to do things yourself; my dad has always been a great example of this. Growing up I thought and knew that "my dad can fix anything!" and that's pretty much true. A brother at our old church told us once how his dad had a saying: "If it can be fixed, we can fix it." Between growing up around my dad and working with all the brothers we have in the Lord, my boys now know that "if it can be fixed, we can fix it." I am so thankful for the good examples around them.

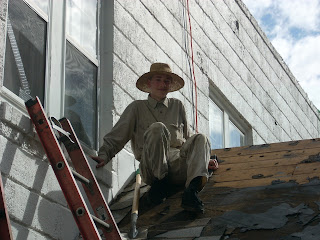
These last several days we have been out of town helping my dad with his roof. While I never got up on the roof, I was happy to be the 'go fer' ... running around here and there trying to get the right nails for the job. Two brothers from our church came with (Olen Yutzy and Chris Irick) and two brothers from our old church were able to help us out on saturday (Elson Miller and Leon Zook). What a blessing!! We always enjoy working together like this and I know my dad was so thankful for the extra hands. The men did not get everything done, but they did get all the stuff done that would have been hard for dad to do on his own.

Our camera woman was left at home to tend to the chickens, the gardens, the seedlings, and to help out a sister who's husband is out of town. I did the best I could, but I know I do not compare to Brianna! I only remembered to grab the camera a few times ... here is what I got:

Elson and Corban

Corban

Leon taking a water break; Olen getting the next piece ready.

A picture of the whole front of the house.

Chris peeking over the edge.

Tylor and dad (Steve)

I like this picture of Chris' hat over the top of the roof :)

Tylor

Tylor and Corban - that black spot above Tylor is a bird.

I like this picture of Olen ... the beautiful blue sky and the pretty green roof.


And then there's one of dad's cats walking around the tools on the kitchen counter. Yuck. Dad has cat hair everywhere! But, they sure are nice cats.

We were blessed to stay over at Elsons' house thursday evening for a nice time of fellowship. We got to dad's on friday morning and had a long day of work. It started to rain a little towards the end, but then that was all for the rest of the time. Saturday we finished around 5, cleaned up, went out to eat, and then most of us took a nice walk around dad's neighborhood. We got up early sunday morning and made it in time for church at 10am (6 hour drive). A sister here, Monica Rohrer who Brianna stayed with, was so thoughtful to have us lunch in the crock pot! I was beyond thankful to not have to worry about fixing up something to eat. They stayed for lunch and then went home. Here are two pictures of after-lunch play:

Carina and Martina Rohrer :) I don't know what they were doing, but it sure was cute! They pulled the chairs to the couch like that and were playing something.


Here is a picture Brianna got of them this morning I guess before they left for church:

Cute. 

Ok. Time to make some supper.