Almost FIVE YEARS AGO I did a post on brewing kombucha tea. We do things a tiny bit differently now ... here is a video I did recently to show how we flavor our kombucha. Let me know if you have a different method that works for you :)
FLAVORED KOMBUCHA TEA

Showing posts with label Lacto-Fermentation. Show all posts
Showing posts with label Lacto-Fermentation. Show all posts
Tuesday, May 19, 2015
Monday, May 4, 2015
Easy Homemade Sauerkraut
Making your own sauerkraut is super easy :) I know I've posted a 'how to' blog before on this subject but here is a quick video demonstration. I hope it is helpful!!
Friday, May 1, 2015
Easy Lacto-Fermented Apple Chutney

Another super easy lacto-fermented food ... probably a good one for beginners since it is sweet. Excellent alone or paired with yogurt, pancakes, cottage cheese, etc. Video at bottom :)
3c chopped apples, any variety
1/2c seeds or chopped nuts - sunflower seeds, almonds, pecans, walnuts, etc.
1/2c dried fruit (chop if larger) - dates, figs, dried apricots, raisins, etc.
1/2c distilled or filtered water
1/4c fresh lemon juice
1/4c starter (whey, water kefir, ginger soda, kombucha, liquid from carrot or other veggie ferment, etc.)
2T unrefined sweetener - pure maple syrup, honey, sucanat, rapadura, etc.
1/2t sea salt (such as Redmonds Real Salt)
1 - 2T spices to taste
(I use a combination of spices but you may use only cinnamon or a pre-made mix such as 'pumpkin pie spice'.)
My combo: 1T cinnamon, 1/2t nutmeg, 1/2t ginger, 1/4t cloves, 1/4t allspice, 1/8t cardamom, 1/8t anise seed ... or something like that :)
Mix together thoroughly. Place in a 1qt mason jar with a tight lid or an airlock (D-I-Y Fermenting Airlock Tutorial). Leave on the counter to ferment 2-3 days, after that store in the refrigerator. Keeps about 3 weeks but really you should have it eaten by then. :)
For more videos please see our youtube playlists.
Saturday, March 7, 2015
Beet Kvass: Lacto-Fermented Super Tonic How-To Tutorial

Beet Kvass is said to be a lacto-fermented super tonic that aids in digestion, helps cleanse the liver, promotes regularity, good for kidney stones and other ailments, and helps to alkalize the blood. How do I know this? I read it ... so I guess I just have to take 'their' word for it ... but if you have success stories please feel free to share.
Before I continue however I'd like to share an apparent pet-peeve (and, I believe, rightfully so) of many who are of Russian or Ukrainian origin. Kvass or Kvas is actually a fermented drink made with grain, usually rye sourdough bread, not beets!!! So really I am not sure we can properly call this drink beet "Kvass" (maybe 'fermented beet liquid?') but it seems that is what has become the new thing. So, here on this blog, though I know that REAL kvass/kvas is made from grain/bread, I will still call this drink "beet kvass" ... ok? But be watching! I'll eventually post a 'how to' on the original Bread Kvass. Maybe. We'll see.
Beet Kvass can be consumed straight up (start with 4oz or so, morning and night, but how much is too much? I'm not sure.), diluted with fresh juice, water kefir, kombucha or ginger soda, or even used as a vinaigrette in a salad dressing recipe. It may be added to soups too, although the soup must not be so hot that it kills the beneficial bacteria, enzymes and yeasts. Lukewarm is good. From all the comments I have read, there are usually two camps on the taste ... really good or really nasty. I'm with the former camp. This stuff is absolutely delicious to me and I like it best 'straight up'.
As with all lacto-fermented foods, the variations of methods and recipes seem endless for beet kvass, so in this post I will not only share how I make it but I will also share all the variations I have found though I'm sure I have missed some. [My method will always be in brackets.]
- Not many mentioned the quality of the beets (besides saying organic is best and preferred). Choose beets that are firm, preferably fresh from the garden.
- First conflict of course is the amount of beets to use. Most recipes I found are pretty vague and leave a lot to individual interpretation with phrases like "3-4 medium sized beets". Some had nearly a jar full of beets while others opted for only half-full or even 1/3 full ... and of course everything in between. Most seemed between 1/3-1/2 full. [For the sake of consistency I'm much more fond of doing things by weight, so I filled my 1/2 gallon jars somewhere between 1/3-1/2 full of beets and weighed them ... almost 400g.]
- On peeling. Peel the skins, do not peel the skins, peel if not organic and leave on if organic. Skins are said to hasten the fermenting process because they harbor beneficial bacteria ... yet some opt for peeling while others say there's no other way but to leave the skins on. [I do NOT peel them.]
- For skins left on ... scrub well, do not scrub well, just rinse off. The 'do not scrub too much' camp believes the more skin the better (because again, skin is said to aid in the fermenting process). [I scrub decently well if the skins are tough, a little softer if they are fresh out of the garden.]
- Skin or no skin, the beet tops are to be trimmed off, tails removed. [Save tops for other ferments, for juicing or throw in your green smoothie.]
- Size of beet pieces: chop small, chop medium, chop large. I found instructions of 1/2" pieces to 2" or more. All however said do not shred - really small pieces or shredded releases too much of the beet sugar at once and causes the product to ferment quickly thus elevating the chance for mold to form. [I chop roughly somewhere between 3/4" - 1 1/4"]

- To whey or not to whey, that seems to be the question on most folks minds. Most half-gallon recipes called for 1/4c whey along with the tablespoon of 'good salt'. (Left to your imagination or personal bias/preference, nothing mentioned as far as I have found about the different weights and sizes of various salts. I use Redmond's Real Salt.) Some say you can use kraut juice instead of whey for a non-dairy alternative. Some say you can purchase a 'starter culture' for more consistent results.
- No whey? Omit the 1/4c whey (or kraut juice or starter) and instead use an additional 1T salt. [For this batch I did a side-by-side experiment - one without a starter and one with 'juice' from my lacto-fermented carrots. I don't think I'll be using the starter next time.]
- Herbs, other seasonings and/or other veggies are optional ingredients; add alongside the beets, salt and [optional] whey/kraut juice/starter. Rosemary? Caraway seeds? Celery seeds? Orange peel? Ginger? Garlic? Cabbage? Onion? Let your likes guide you ... a tip though ... put the other veggies in first and then beets on top; this will help keep the other stuff from floating to the top.
- Add distilled or filtered water up to 1" to the top of the jar. [I find it easiest to mix the salt and optional starter with some of the water first, add that to the beets and then top off with more water and stir well.]
- Cover the vessel ... with just a cloth, a plastic lid, a metal lid, an airlock. Airlocks were mentioned when commenters were having issues with mold as airlocks offer a controlled fermenting environment (preventing the wild yeasts and bacteria from your home from getting into your fermenting vessel). Hardly anyone that I found said to use a cloth, but I did see a few. The common method seems to use some sort of air-tight lid. [For this batch I used my new homemade airlocks with half-gallon jars.]

- Fermenting time. Some say leave it sit out for only 2 days, others say leaving out a month or so gives it the best flavor, and then you may find everything else in between (I found one even mentioned leaving it out for only one day if it's warm in your home). 1-2 weeks seemed more common though and I found one that said "go by taste, not by time." I personally like this method the best, however it's not practical if you've never tried it before! [After 24 hours I noticed the salt-only jar had a few more bubbles than the salt+starter jar. At about 36 hours there was a marked difference in color; the salt-only jar being slightly red/orange and the salt+starter jar being more beet-red. At 6 days out they looked pretty much the same color ... beautiful, deep, beet red, however the starter jar had mold on top. Both tasted fabulous, but one was obviously a bit more salty than the other. The starter+salt batch seemed a bit more effervescent than the salt-only batch. See photos below.]


- Many mentioned mold, most said to just scrape it off and continue. [that's what I did this time ... the jar without the starter never formed mold, however the jar with the starter did ... see below ... it scrapes off real easy and then looks just like the other one. Sometimes you might encounter a white film either on the veggies or the liquid or both. That is not mold but yeast. See this helpful article (off site) that gives a little more info about it.] [Update - I made another batch using liquid from a NEW batch of fermented carrots and that did not develop mold ... so it could have just been something in the old batch? Whatever the case, we drank it anyway and it was very good ... or at least I thought it was very good ... others just tolerated it :) ]

[another update - I made 3 batches using the salt-only method. One formed quite a bit of mold, though I shook the jar trying to get the airlock off and the beet juice covered much of the mold, another formed a little spot of mold and another formed a black-looking film on top. All cleaned off easily and taste normal - see 'before and after' photos below.]
 |
| before |
 |
| after |
- Strain out the 'tonic', pour into a glass container with a tight fitting lid (or see optional step below) and keep in the refrigerator for a long time (but really you should drink it ... don't let it sit there!).
- Second batch from the same beets: save back some of the liquid and all of the beets. "Some" means different things to different people. Here are 'some' variations I found: about 10%, a half cup, an 'inch', 'a little bit left in the jar', and so on. Top off with water as before and allow to sit on the counter a day or two or three (or more). Some say to add more salt (about 2t if using a half gallon jar), however most leave off the salt for the second batch. Worth noting: one recipe I found only required the beets to be saved back; this recipe also required more salt.
- Optional step after straining ... It may be bottled up and left out on the counter an additional 24-48 hours to promote carbonation (if preferred). Though from my experience this never gets fizzy like ginger soda, just a little effervescent. If yours gets fizzy like soda, let me know ... I'll be curious of the differences in methods.
Some say flavors may be added to the bottle along with the strained liquid - like a few TBS of fresh juice (beet, apple, etc). Of course you may also skip this step and put it right into the fridge. [see below - after 2 days bottled on the counter the one with the starter began to form a little mold. I put it in the fridge and drank it anyway.]

Do you make 'Beet Kvass'? If so, please feel free to share your method below!
Friday, February 27, 2015
Homemade Lacto-Fermented Ginger Soda, Revisited
I've been making my own homemade lacto-fermented soda for about 3 years now and made a post about my original method sometime during the first several months (see here: Lacto-Fermented Soda). I believe have perfected it since then and feel the need to revisit this topic to share my observations and alterations.
(6-30-15 For a video, please see this link: Ginger Soda)
You see, it started to not taste so good and I became less and less interested in making it. I gave it up for a few months but then decided that maybe I just needed a fresh starter. I made a new starter and that helped, however after several months it began having the same issues of not tasting quite right. It was then that I decided to change my method. In my previous method I would simply save back a cup or two from the last batch of soda to use as a starter for the next batch of soda. At the same time I had been maintaining a sourdough starter for quite a while - I would keep the same starter but feed it when it needed fed and that kept it fresh and good. I decided to do the same thing with the ginger soda - instead of saving back a cup or so from the last batch I just began maintaining a starter. This has proven to work so much better ... however I do make a fresh sourdough starter every year in the spring and I might do that with the ginger soda too. We'll see.
So, here's the way I do it now.
* Organic ingredients are always preferable but not absolutely necessary.
For the starter/bug
Fill a quart mason jar about 2/3 full. Add to it 1T FRESH grated ginger and 1T sugar. Mix well to incorporate the ingredients and air into the water. Cover with a coffee filter or cloth secured with a rubber band. This allows wild yeasts and bacteria into the jar but keeps the bugs out. If your house is cold try to set the jar in the warmest place.
Each day thereafter, around the same time each day, you will add 1T of FRESH grated ginger and 1T sugar. Mix well to incorporate the ingredients and air. Stir again approximately 12 hours later. (so you will be stirring it every 12 hours)
I like to taste my starter each time after adding the ginger and sugar. It should be pleasantly sweet and somewhat gingery. If it tastes too much like ginger (which makes me think of alcohol) it needs more sugar. Add what you think is needed ... a teaspoon? A few teaspoons? Another tablespoon? You might also need to skip adding the ginger (or only add a small bit) for one day but add the sugar. You'll learn what's right.
After about 3-7 days your starter should be ready - a warmer temperature in the home makes the starter go faster, a colder one makes it slower. You will see bubbles on top and when you stir it you will hear it fizzing like soda. If it only fizzes a little bit you might want to leave it another day or two.
Now you have what is called a 'bug'. You are ready to proceed to the next step.
For the soda base/wort - This is for one gallon of soda.
Ingredients:
1/3c packed grated fresh ginger
1 1/2c sugar
Approximately 1 gallon of distilled or filtered water
1/3c FRESH squeezed lemon juice
1c strained soda starter/bug (SAVE THE REST OF THE STARTER! see below)
Pay attention now! This is important. You do NOT want to heat your starter! You will KILL it!
Fill a pot with a half gallon of water and the 1/3c packed grated fresh ginger. Bring to a boil, cover and allow to simmer for 20 minutes.
Remove from heat, stir in the 1 1/2c sugar and allow to sit until it's at ROOM TEMPERATURE. You may cool it down quicker by putting it in a sink of cold water ... just be sure to not get the water into the pot.
Once the syrup is at ROOM TEMPERATURE add the 1/3c fresh squeezed lemon juice and the 1c soda starter/bug. Mix well.
Pour all into a glass gallon jug and add water to the shoulder. Taste it. It should be slightly sweet and gingery. Top with a coffee filter or cloth secured with a rubber band.
Leave on your counter. Stir every 12 hours and taste each time. You are looking for obvious bubbles and fizz. Also, it should be mildly sweet. If the sweetness goes away but you still do not see bubbles or fizz, add a little more sugar until it's mildly sweet again (I've never had to do this but I'm putting this in here just in case it happens to you).
This step usually only takes 1 to 2 days (24-48 hours or anywhere in between). If it's colder in your home it might take longer than 2 days. If for some reason you reach 3 full days and still do not see bubbles or fizz, you may try replacing some of the liquid with more starter (a half cup to a cup), adding more sugar if needed, and seeing what happens after another day or so. Again, this has never happened to me but it's possible.
Once you have fizz and bubbles you are ready to move on to the next step. Eventually you will learn how you like it to taste at this point too. I leave mine sit a little longer even after the fizz and bubbles start showing up.
Bottling your soda
This is the finishing stage that will really add carbonation to your soda and reduce the sweetness a little.
Strain off the ginger and discard or compost it. (I tried giving this to my chickens but they were not interested at all!).
You may add a little more sugar if you want it a little sweeter. Again, you will learn what you prefer. I never add more sugar but I do not like things so sweet.
Using a funnel, fill your bottles within 2" to the top (or if you are using plastic bottles you may fill a little fuller, but no more than 1" to the top). For the first few years I made this soda I was using plastic 'juicy juice-type' jugs. They are really air tight and work well enough, however I discovered a store in Rogers, AR, that had the fancy Grolsch-stole bottles (EZCap brand that are said to be the better ones) for a really good price so I went ahead and purchased a case of 16oz bottles (12 in a case). I did not regret this purchase at all and in fact just ordered the 32oz bottles for my beet kvass and for larger bottles of soda when we have company.
Anyway, fill your bottles and cap them with an AIR TIGHT LID.
Leave on your counter for a day or two or three to build up carbonation. The longer it sits out the less sweet it will be.
To check simply open the bottle and taste it, but be careful! It might spill out so open over the sink or outside. Each time you open a bottle to check it it will lose carbonation. To restore some of the lost carbonation simply put the lid back on and leave it out a little longer than the other ones.
When the soda is done, transfer it to the refrigerator. This will almost halt the fermentation process, however the organisms in the soda will continue to slowly eat the sugar ... the older it is the less sweet it will be, but it does keep indefinitely so do not be afraid to drink the old stuff!
Maintaining your starter
Now you still have this starter to think about; I will share what has worked very well for me.
Strain out the ginger bits and put the rest back into the quart mason jar. Add water until it's about 2/3-3/4 full. Add a tablespoon of fresh grated ginger and a tablespoon of sugar. This should sound familiar, right?! Just like before, you will add 1T of each grated ginger and sugar, mixing well twice a day, however this time you will only need to do it for about 2-3 days. Again, taste it to make sure it is mildly sweet and gingery. If it is too strong of ginger or alcohol, add more sugar and little to no ginger. If it is too sugary, leave off the extra sugar for a day or so.
Your starter should be bubbly and fizzy.
Now it is ready to be stored in the fridge until you need it next. I leave the cloth and rubber band on it and then I put a jar lid on top and put the ring on loosely. I do not keep it air tight.
A day before you are ready to make more soda take the starter out of the fridge, mix in 1T each ginger and sugar, stir again 12 hours later, and then 12 hours or so after that you are ready to make more soda. If it's really strong I leave off the ginger.
And the process repeats on and on.
Variations
You may wish to add a little concentrated fruit syrup before bottling it. This will give it different flavors but will also give the organisms more sugar to eat ... and might make the bottles super fizzy. If I make 2 gallons at a time I still have to use the plastic juice bottles for some of my soda because I do not have enough of the EZCap bottles. Occasionally I will add a handful of frozen strawberries, peaches or blueberries (or whatever) to the jug. This also makes it more fizzy. One time I opened a plastic bottle in front of company and I'm not joking at all, the soda shot clear to the ceiling and made quite the mess!! It was a good laugh.
Also, you do not HAVE to use ginger for the wort/syrup ... you may choose to use 6c of fruit like strawberries, grapes, blueberries or whatever. I have yet to find a fruit I like to use in place of the ginger; also, it just uses so much fruit that it seems a waste of fruit and money to me!!! I just stick with the ginger.
One final tip: When you make your first batch of soda I suggest you take notes so you'll have a better idea of what to do differently for the second batch.
Wednesday, February 25, 2015
DIY Homemade Airlock for Fermenting

Not too long ago a commenter on my Easy Lacto-Fermented Carrots video asked why I did not use airlocks. My only reason was that I thought they were too expensive but I hoped to own at least one some day, money permitting. After some research however it seems using an airlock produces a truer ferment and is sure to keep out unwanted, air-born bacteria and yeasts which might contaminate your batch. Though I've never had a problem with the latter, I was still curious of the benefits so I asked said commenter if he had any suggestions. He said he made his own quite cheaply ... and of course that got my wheels turning ... and I am now the owner of 6 airlocks for way less money than what I ever thought possible.
Here's how I did it.

I purchased the individual components needed from Amazon. I will link them here but I'm sure sooner or later the supplier will run out, the links will be changed or whatever. If you notice a link does not work, please let me know and I'll try to find another one.
3 Piece Plastic Airlock (pack of 6) $8.41
12 GROMMETS BPA-free Food Grade Silicone for Fermenting in Mason Jars $7.17+$2.20 shipping (there was a shipping discount for ordering this and the next product from the same seller)
12 STOPPERS #000 3/8" BPA-free Food Grade Silicone $7.17+$2.19 shipping (NOT needed but handy)
Supplies already on hand:
Drill with 5/8" bit
Wide-mouth Tattler lids and rubbers
Wide-mouth rings
Wide-mouth mason jars of various sizes (1/2pt, pt, qt and 1/2gal)
Note: if you do not have Tattler lids the normal metal lid may be used however an alternative that can usually be purchased at a local store is the plastic "Ball Storage Caps" ... but they are NOT air tight so you WILL NEED a rubber gasket of some kind.
Tattler lids can be purchased from their website or on Amazon (or other places too I'm sure).
Ball storage caps can be purchased from the local store or Amazon (or other places too I'm sure).
Rubber gaskets (reusable silicone seals for mason jars) to use with the Ball storage caps can be purchased on Amazon (or other places too I'm sure). Or you may use a Tattler rubber.
These nifty reCAPs should work too ... I found them on Amazon. They look exactly like what is used in this video. This would eliminate the need for the drill, the bit and also the [optional] stopper and rubber/silicone gasket.
Corban drilled a 5/8" hole into each Tattle lid and then the 3-piece airlock was inserted until the tip came through the other end snuggly.
Now I have airlocks for any size wide-mouth mason jar ... half gallons for things we eat more of (like sauerkraut, curtido, or carrots) and 1/2pt jars for things we either do not need much of or for experiments. Yay!
First up: Beet Kvass (be watching for a post in the near future!) and Carrots. Yum.
Wednesday, July 9, 2014
Fermenting the Harvest ... Corn Relish, Pickles and Curtido
There are a variety of ways you can preserve your harvest ... canning, freezing, dehydrating and, a more traditional but not as used method today: fermenting. A handy dandy guide that I appreciate a lot is a book called "The Complete Idiot's Guide to Fermenting Foods" by Wardeh Harmon.

While I do not follow her recipes and methods exactly, I do use this book as a reference tool. It is an excellent place to start if you do not know much (or anything) about fermenting foods.
With that said, here is what I did today and yesterday.
Today I made corn relish, cucumber pickles, and an experiment of pickled green beans. These were just the green beans that were ready to pick RIGHT NOW in our 'city garden'. I'm not sure what's going on at the country garden (where our main green bean crop is) but our city garden only has a few pole bean plants and only a handful were ready today so I threw them in a pint jar with a garlic clove and a slice of onion, covered them with brine and they are good to go.
The corn relish I have never done before but it smells wonderful so far! Fresh corn picked yesterday, cilantro and jalapenos picked today, and onion and tomato ... from the store ... my tomatoes are not ready yet.
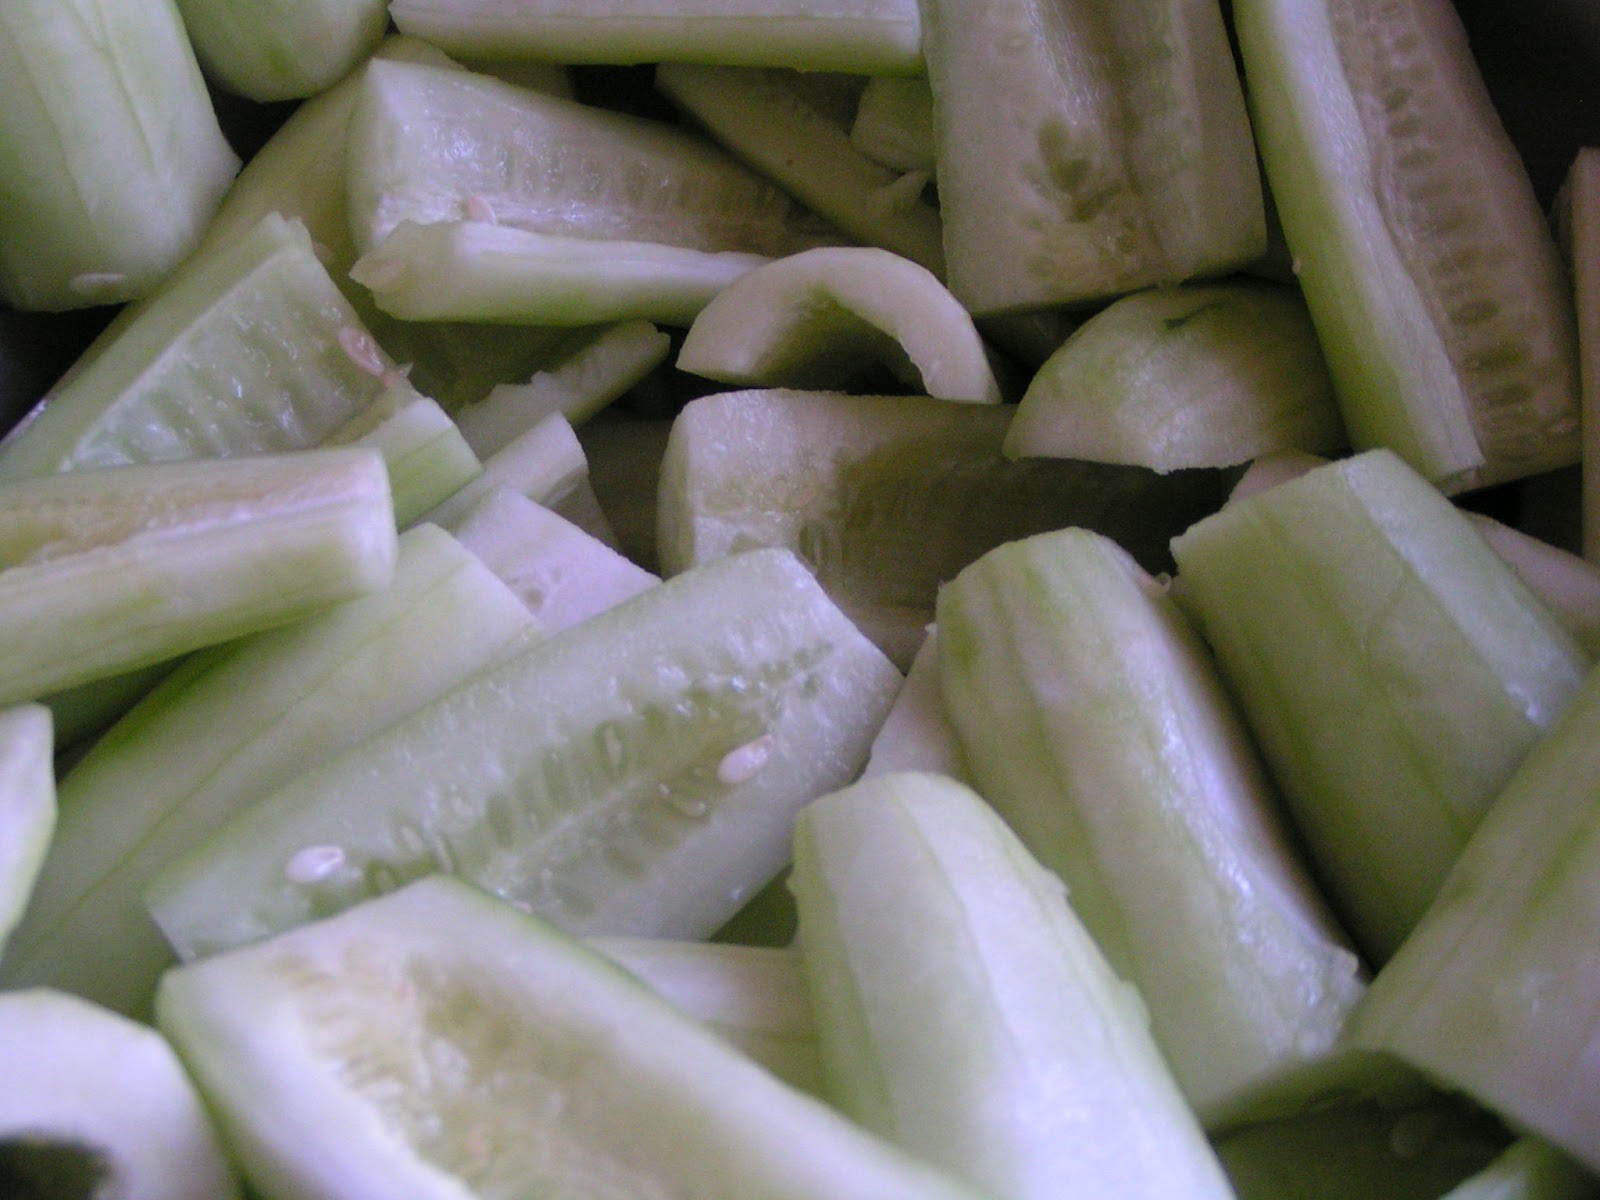
And the cucumbers ... yum. I picked those today along with fresh dill in the garden. The garlic and onions came from the store.
These are not the best pictures, but here they are ... also, these were both taken right after I put the food into the jars. This time tomorrow I suspect it will look a little different. Maybe I'll update with photos?
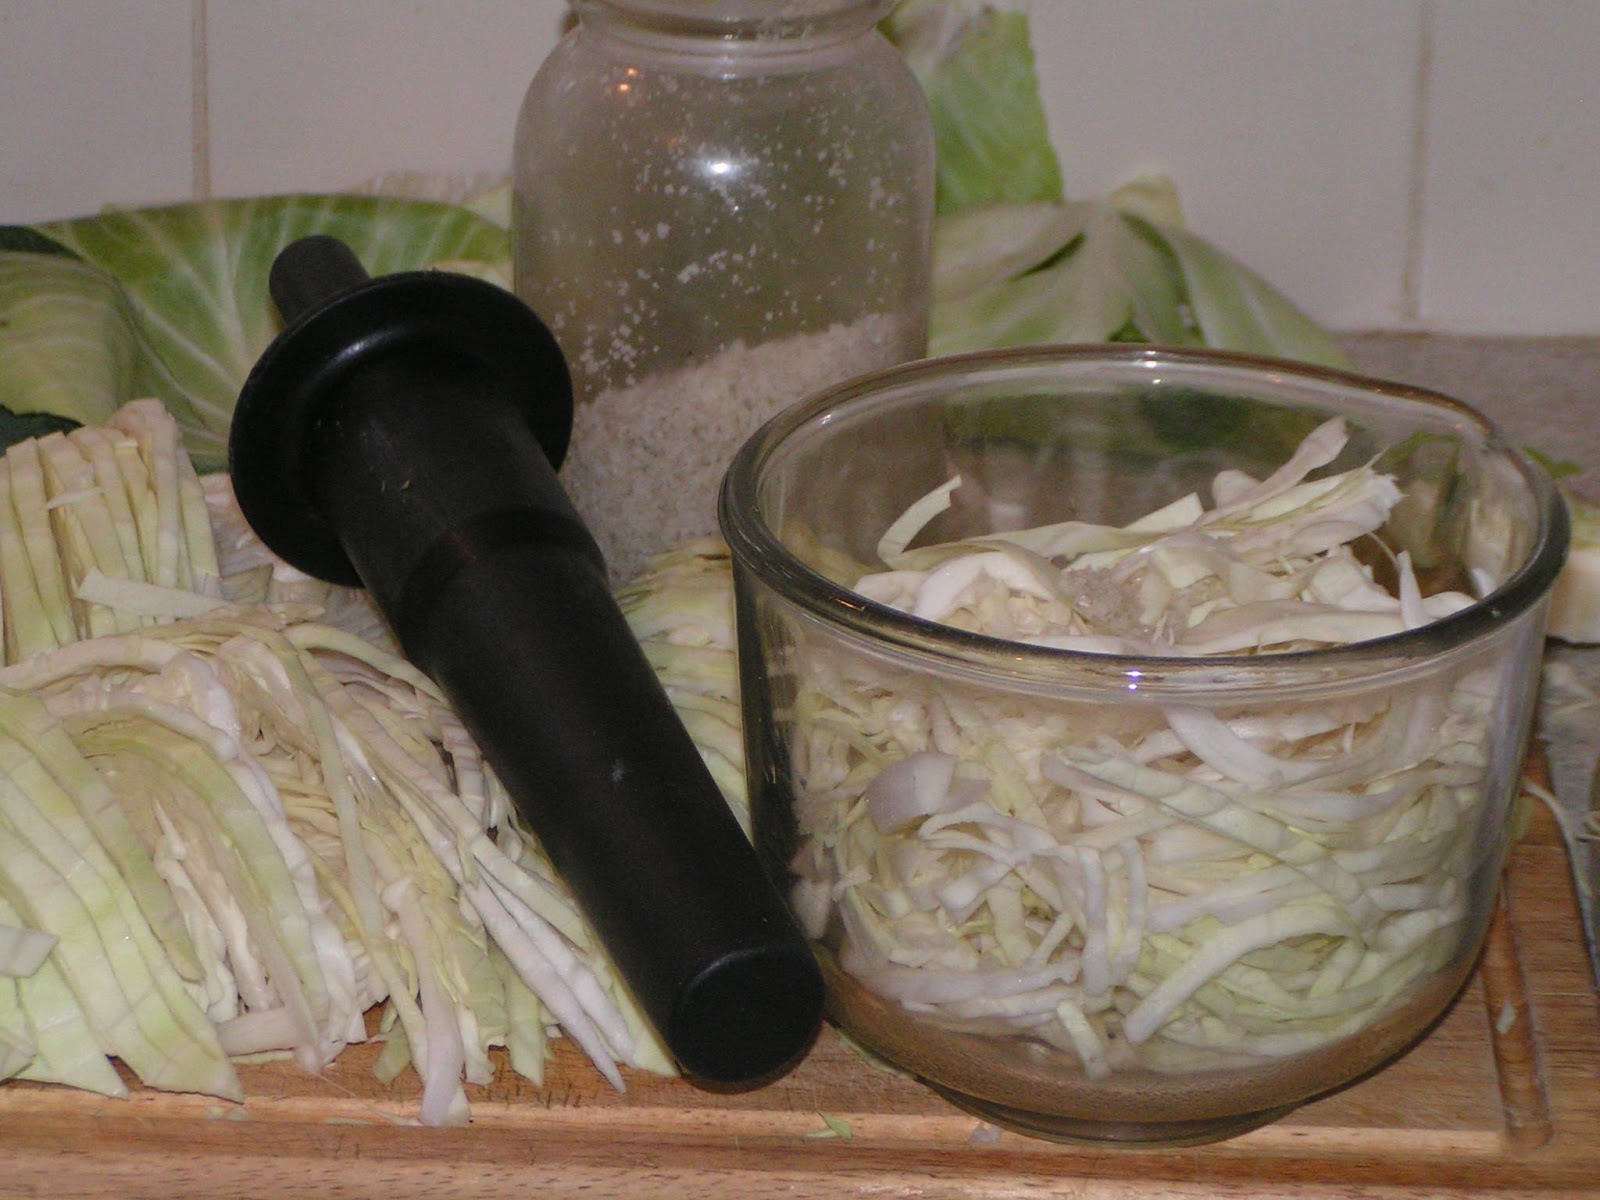
Curtido is such a tasty dish!! I have never made it fermented but it smelled SO GOOD yesterday while I was getting it all ready. Cabbage from a friend's garden, organic carrots from our bulk food order, cayenne peppers and oregano from our garden and onion from the store. The ratio of salt to produce is 3T/5lbs. In order to keep things simple, first shred and chop everything except the cabbage. Put it all in a bowl and weigh it ... subtract that from 5 pounds and weigh out the missing amount of cabbage. I used nearly 3 heads of cabbage, but it really just depends on how large/small and lose/tight the heads of cabbage are. The last thing to be shredded is the cabbage. I usually use a chef's knife to shred cabbage, however since I just got my kitchenaid I tried out the shredder attachment. I am pleased enough with the results to do it from here on out.
After all the vegetables are chopped or shredded and ready to go, sprinkle on the salt and mix well. I allow mine to sit for an hour or so to give the salt time to draw out the juices in the vegetables. This also gives me time to go help my old lady friend ;) In order to protect the vegetables from offending flies while I'm away, I put a rack over the bowl and cover all with a bread towel. You might have a lid that fits your bowl ... which would be convenient.
Come back later, stir well and pack tight into a glass gallon jar or other vessel good for fermenting. Weigh it down with a piece of plastic and a glass jar filled with water (or a heavy plate and rock if your vessel lacks a neck). Put the lid on, write the date on the jar with a sharpie (it will rub off), and allow to ferment on the counter till it is to your liking, but let it sit at least three days. Our ferments usually sit for a week or two or three, depending on the temperature in the house and what we are fermenting. It's really warm in our house right now so the whole process will be a bit quicker.
When done, store in a cool place (preferably a cellar) or in the fridge if no such place exists in your home.
Here are step-by-step photos of that process. Some were taken with flash and some without. My kitchen has terrible lighting it's hard to get nice photos!
There you have it! Simple. I did this yesterday and it is already nice and bubbly ... about 24 hours later here is what it looks like (I used a flash yesterday; this is without the flash so it looks a little different but the colour is the same in reality):
I'm anxious to try it!! We'll make pupusas again as soon as this is ready.
I made this recipe up based on how I like curtido to taste (it's not hard to do) however today when I was browsing through the book mentioned above I saw she had a recipe as well. It was somewhat different from mine, but I'm going off my personal tastes ... though I've never used cayenne in it before. We all like cayenne around here and we are so thankful our 4 cayenne plants are thriving. I'm not sure if 3 was enough?? I left the seeds in. I'm also wondering if I should have used more oregano? We'll see what happens and I'll try to remember to update this post with the results and any changes I might make in the future.
Do you ferment foods? If so, what are some of your favourites? Do you have a recipe to share?
While I do not follow her recipes and methods exactly, I do use this book as a reference tool. It is an excellent place to start if you do not know much (or anything) about fermenting foods.
With that said, here is what I did today and yesterday.
Today I made corn relish, cucumber pickles, and an experiment of pickled green beans. These were just the green beans that were ready to pick RIGHT NOW in our 'city garden'. I'm not sure what's going on at the country garden (where our main green bean crop is) but our city garden only has a few pole bean plants and only a handful were ready today so I threw them in a pint jar with a garlic clove and a slice of onion, covered them with brine and they are good to go.
The corn relish I have never done before but it smells wonderful so far! Fresh corn picked yesterday, cilantro and jalapenos picked today, and onion and tomato ... from the store ... my tomatoes are not ready yet.
And the cucumbers ... yum. I picked those today along with fresh dill in the garden. The garlic and onions came from the store.
These are not the best pictures, but here they are ... also, these were both taken right after I put the food into the jars. This time tomorrow I suspect it will look a little different. Maybe I'll update with photos?
 |
| Fermented Corn Relish |
 |
| Fermented Green Beans and Cucumbers |
After all the vegetables are chopped or shredded and ready to go, sprinkle on the salt and mix well. I allow mine to sit for an hour or so to give the salt time to draw out the juices in the vegetables. This also gives me time to go help my old lady friend ;) In order to protect the vegetables from offending flies while I'm away, I put a rack over the bowl and cover all with a bread towel. You might have a lid that fits your bowl ... which would be convenient.
Come back later, stir well and pack tight into a glass gallon jar or other vessel good for fermenting. Weigh it down with a piece of plastic and a glass jar filled with water (or a heavy plate and rock if your vessel lacks a neck). Put the lid on, write the date on the jar with a sharpie (it will rub off), and allow to ferment on the counter till it is to your liking, but let it sit at least three days. Our ferments usually sit for a week or two or three, depending on the temperature in the house and what we are fermenting. It's really warm in our house right now so the whole process will be a bit quicker.
When done, store in a cool place (preferably a cellar) or in the fridge if no such place exists in your home.
Here are step-by-step photos of that process. Some were taken with flash and some without. My kitchen has terrible lighting it's hard to get nice photos!
 |
| The ingredients |
 |
| Mince the oregano and cayenne; finely slice the onion |
 |
| Shred the cabbage and carrots (not pictured!); add 3T salt |
 |
| Mix well and top with a rack or other device to hold the towel |
 |
| Cover and allow to sit an hour or two |
 |
| Pack into a gallon glass jar or other vessel |
 | ||
| Have ready a piece of plastic that will fit snug into the jar; I cut this lid to size |
 |
| Layer the plastic lid (pack down tight), jar of water and anything else needed to fill up the space - I had to top off the lidded-jar with a mason jar ring for extra height. I like it to reach the gallon jar lid so it packs down. To prevent spoilage, be sure everything is well under the liquid!!! |
 |
| Top all with jar lid and add the date |
 |
| ~24 hours later - lots of bubbles forming |
I made this recipe up based on how I like curtido to taste (it's not hard to do) however today when I was browsing through the book mentioned above I saw she had a recipe as well. It was somewhat different from mine, but I'm going off my personal tastes ... though I've never used cayenne in it before. We all like cayenne around here and we are so thankful our 4 cayenne plants are thriving. I'm not sure if 3 was enough?? I left the seeds in. I'm also wondering if I should have used more oregano? We'll see what happens and I'll try to remember to update this post with the results and any changes I might make in the future.
Do you ferment foods? If so, what are some of your favourites? Do you have a recipe to share?
Friday, April 18, 2014
EASY Homemade Lacto-Fermented Carrots
For today's 'frugal friday' post I'd like to show you how I make lacto-fermented carrots. Why is this a 'frugal friday' topic? Glad you asked! Lacto-fermented vegetables can be purchased at the health food store and even in some regular grocery stores however you will pay a hefty price for them. For example, I've seen a quart of lacto-fermented sauerkraut going for over $5!! Some organic options are even WAY MORE than that!! The actual cost however is mere pennies in comparison and it does not take much time or effort to accomplish it on your own. Let me show you how ...
Sunday, April 22, 2012
Lacto-Fermented Soda (make your own healthy soda!)
(see my revisited ginger-soda post for how I do it now ... and a VIDEO: Ginger Soda) Recently I tried my hand at soda making ... and I must say ... a real big
YUM!
We really enjoyed our first batch of homemade soda (I made ginger-ale) and have made several more ever since. We tried using grapes one time instead of ginger. I did not care for that very much. I think we'll stick with the ginger!! But, if the boys have a chance to pick some sassafras and sarsaparilla, we'll look forward to homemade root beer.
So, how is it done? Well ... let me see if I remember. First you need the starter. This starter can be a few cups saved from your last batch of soda, or you can start the starter from scratch. Here's how to do that:
Have on hand FRESH ginger root, sugar, and filtered water. A rubber band, coffee filter and wide mouth quart jar are needed as well.

Chop up the ginger small, add 2T of that along with 2T sugar into a quart mason jar filled with about 3c of water. Stir well, cover with coffee filter, secure with rubber band, and let it sit for 1 week total. Each morning you will add 2t of fresh chopped ginger and 2t of sugar. Stir well. Each afternoon and evening you will stir well. It is good to incorporate air into the mix.

Your mixture will eventually start to get a little cloudy, but it will smell pretty good and have a mildly sweet ginger taste each day. At the end of 7 days, it should be bubbling a little ... it might even be fizzing a little. I've read a lot of different instructions on how to do this (including one that was a guest post on here about 2 years ago) and all have a little something different to say, so I guess this is not 100% set on how to do it. Some say it will fizz, some say you will hear the fizz, some say it will bubble a little, some say it will bubble a lot. I was somewhat concerned because I could not hear a fizz in my starter by the end of 7 days, nor was it really bubbling much. I saw small bubbles around the perimeter of the jar, but that's it. I used it anyway to go on to the next step ... and it ended up working just fine.
OK ... so the next step is called the "wort". You'll need fresh ginger, lemon, sugar, filtered water, a gallon glass mason jar and a coffee filter with a rubber band. Well ... you'll also need a pan and something to stir with.
Grate the ginger (you do not have to peel it) with a cheese grater until you have about 2oz. I should have measured the 2oz in a measuring cup as well, but it seems to be about 1/2c of unpacked grated ginger. I'm guessing here. Add the grated ginger and 1 1/2c sugar to a pan with half a gallon of water. Bring to a boil, and then simmer for 20 minutes.


Remove from heat and pour into a clean glass gallon jug. I read somewhere that putting a butter knife into the glass jug helps prevent the jug from cracking. It must work because I have not cracked a jug yet. Add the juice of 2 lemons and some more water (but be sure to leave plenty of room for your starter!) and let it sit till it reaches room temperature. To hasten the cooling process, you can set the jug in a bigger container and fill the container with cold water. Stir occasionally and add more cool water as needed. Once it is cool, add the starter and more water to reach about an inch to the top. Here is a picture of my cooled mixture with the starter next to it (this is starter from my last batch):

Place a coffee filter over the top and secure it with a rubber band:

Let it sit for at least 2 days. Taste it. It should be fizzy and have a lightly sweet ginger taste. If it's too sweet, there is too much sugar in it. Leave it sit for another day and taste it again. The more you make, the more you'll know what to look (or taste!) for. It's all right if it's a little sweet - more sugar will be eaten up in the final process. Bottle the soda. Some like to get all fancy and use soda or beer bottles with special lids that look like this (or bottles with lids separate):

But, I don't have money for these bottles right now and found it works to just use old juice jugs with tight fitting lids. The discount store here sells organic juice for $1.50; sometimes we drink the juice with a special 'breakfast supper' or I will use the juice to make more soda (take out a cup of the juice and replace it with a cup of starter), and then use the jug for the finished product :) It works out well. The key is, the lid must fit (it must be air tight). The soda now needs to sit in the jug/bottle for a day or two out on the counter. Be sure to release the air whenever needed ... you don't want it exploding! Taste it once or twice a day and when it has the right amount of fizz and a good flavor, secure the lid and put it in the fridge. The stuff could sit there for months ... but we drink it up quick and have more going nearly all the time.
Let me know if you try it!
Saturday, March 17, 2012
Sauerkraut (lacto-fermented)
(here is a new video I just did for making sauerkraut: Homemade Sauerkraut)
We have been making our own lacto-fermented sauerkraut for several months now. I am not a fan of canned sauerkraut at all, so I always assumed I would not like this stuff either. But ... I do like it. It certainly is not on my 'favorites' list, but I am thankful for the beneficial bacteria this lacto-fermented stuff offers to my gut.
To make your own, you will need: 1 head of cabbage, 2T good salt (I use celtic gray salt, but Real salt would work ... or pickling salt), a large glass jug (I use a glass pickle jug that is just over 2 quarts), a 1/2 pint jar, a plastic lid of some sort (see instructions below), a glass bowl, something to pound with, a cutting board, a knife, a little bit of time.
Here are the steps ...


10) Here is a picture of our finished sauerkraut - even more bubbles at the top and the cabbage/liquid level have changed. I think it sat out for 6 days?? Last time we left it out for 3 weeks before we put it in the fridge, but it was colder then as well. Usually we let it sit out for at least 7 days but not much longer than 2 weeks (unless it's too cold in the house!) Sauerkraut can be stored in a cool place, like a cellar (or the counter top if it's cool in the house), for many months. Or you can store it in the fridge. DO NOT HEAT IT! Consuming it raw preserves all the good bacteria in there; if you cook it you will kill the bacteria.

Be sure to check out the three other posts I did today! Gardening, Chickens and Cucumbers ... oh my!
We have been making our own lacto-fermented sauerkraut for several months now. I am not a fan of canned sauerkraut at all, so I always assumed I would not like this stuff either. But ... I do like it. It certainly is not on my 'favorites' list, but I am thankful for the beneficial bacteria this lacto-fermented stuff offers to my gut.
To make your own, you will need: 1 head of cabbage, 2T good salt (I use celtic gray salt, but Real salt would work ... or pickling salt), a large glass jug (I use a glass pickle jug that is just over 2 quarts), a 1/2 pint jar, a plastic lid of some sort (see instructions below), a glass bowl, something to pound with, a cutting board, a knife, a little bit of time.
Here are the steps ...
1) Start with a good sized head of cabbage.

2) Peel off the outer layers and chop off the core at the bottom.

3) Quarter the head and slice out the center core.

4) Cut into thin strips; I found out later I prefer a little thinner than this. You'll eventually learn what works best for you and your tastes.

5) Place a quarter at a time into a bowl with 1 1/2t good salt and pound it down. I use the tamper from my vitamix, but there are special wooden kraut pounders that would be so nice to have ... they would probably work a lot more efficiently, but oh well. Maybe some day.
**Update: I now place a quarter at a time in a LARGE bowl, sprinkle salt over it, put another quarter in, sprinkle salt over it, put another quarter in, sprinkle salt over it, and so on. I then cover it with a towel and let it sit for an hour or longer (sometimes I get busy!). This really helps to draw out the juices and reduce the pounding time. Instead of pounding it in the bowl, I shove it into the glass jug and pound it down in there with my vitamix tamp.**
**Update: I now place a quarter at a time in a LARGE bowl, sprinkle salt over it, put another quarter in, sprinkle salt over it, put another quarter in, sprinkle salt over it, and so on. I then cover it with a towel and let it sit for an hour or longer (sometimes I get busy!). This really helps to draw out the juices and reduce the pounding time. Instead of pounding it in the bowl, I shove it into the glass jug and pound it down in there with my vitamix tamp.**
6) As you can see, the cabbage reduced by quite a bit and it is getting juicy. I think I pounded this for about 5 minutes total. Put this pounded cabbage into a 2qt (or larger) jar and repeat this process with the remaining 3 quarters; don't forget to add more salt!

Here is a picture of all the pounded cabbage in the 2+qt jar.

See the liquid (cabbage juice & salt) at the bottom?

7) Now you want to pack the pounded cabbage as hard as you can into the jar. The cabbage needs to be totally submerged in the cabbage/salt juice ... to make this possible, I cut out a plastic cottage cheese or butter lid just about the size of the inside of my jar. Maybe you can see the lid on top of the cabbage in this picture below?

8) Take another glass jar and fill it with water. Put a plastic lid on if you have one. Place this jar INSIDE the cabbage jar, on top of the plastic circle. Push down and you will see the juice rising above the cabbage. This inner jar will act as a weight to keep the plastic circle pressing down on the cabbage and thus keep the cabbage totally covered with the liquid at all times. If it is exposed to the air, it will oxidize and eventually begin to rot.

9) Now the waiting begins! Let it sit on your counter for at least 3 days. Here is a picture of the sauerkraut after 1 1/2 days - notice the bubbles forming at the top of the liquid? This is exactly what you want it to do.

10) Here is a picture of our finished sauerkraut - even more bubbles at the top and the cabbage/liquid level have changed. I think it sat out for 6 days?? Last time we left it out for 3 weeks before we put it in the fridge, but it was colder then as well. Usually we let it sit out for at least 7 days but not much longer than 2 weeks (unless it's too cold in the house!) Sauerkraut can be stored in a cool place, like a cellar (or the counter top if it's cool in the house), for many months. Or you can store it in the fridge. DO NOT HEAT IT! Consuming it raw preserves all the good bacteria in there; if you cook it you will kill the bacteria.

Be sure to check out the three other posts I did today! Gardening, Chickens and Cucumbers ... oh my!
Cucumbers! (including cucumber juice and lacto-fermented cucumbers/pickles)
CUCUMBERS!
(this is the third post I have done today. Be sure to check the other posts for updates on our gardens and chickens)
Tylor and I stopped by the discount store last week when we were out and about, and saw they had crates of cucumbers for $2 per crate (crate included!). WOW. These were pretty big crates too - bigger than a banana box. We got 3 crates, but then on the way home I thought how I should have gotten several more. Even if the cucumbers were not so good, the crates alone were worth more than $2 each. They are very sturdy plastic, stack on top of each other, and fold when not in use. We plan to do the farmer's market this year and these crates would be a blessing! So, a few days later Brianna and Corban when back and got 9 more. What to do with all the cucumbers??? Well ... we have a few ideas.
1) We gave several away. Bags and bags of them.
2) We composted the rotten ones.
3) We fed some to the chickens.
4) We made cucumber salad from some.
5) We made cucumber juice - I added lemon for a better flavor. I am not a fan of raw cucumbers ... but I have managed to choke down cucumber juice each day for the last week. I made nearly 2 gallons of the stuff!

6) We made lacto-fermented pickles. These are not like modern day pickles. the acid in these is produced by the activity of beneficial lactobacillus which occurs when you expose vegetables to a large amount of salt in an oxygen-free environment. This stuff is really good for your gut!
Normally these are made with pickling cucumbers ... but we decided to give it a try with slicing cucs. Since the origin of these cucs was questionable and the skins were exposed to all sorts of rotten cucs, we decided to peel the cucs first. If you use whole cucs, be sure to cut the blossom end off.
So, peel, then slice, then shove into a gallon jar. Add some raw onion and garlic and also some fresh or dry dill. Pour salt water over all (4-5T of pickling salt boiled with 2qts of water; cool first. Make more if needed). The pickles must stay below the liquid level - in order to do that, we inserted a piece of round plastic from a cottage cheese or butter lid and put a 1/2 pint mason jar on top to weigh it down.

You can kind of see the 1/2 pint mason jar in this front jug ... but the 1/2 jars are in ever jug. We put lids on our jugs ... but I've seen some say to just cover with cheese cloth and a rubber band.

We added sliced hot peppers (seeds included) and red pepper flakes to one of the jugs of pickles.

Leave jars out on the counter. After 3 days, taste them. How do they taste? If you want them a little more acidy, the let them sit longer. Here is a picture of the pickles one week later. As you can see, the color has changed a little and there are a few bubbles at the top. I think there should be a lot more bubbles than this ... but this was our first time trying it, so we'll see what happens next time.

And after all of that, we STILL have several bags (20??) of good cucumbers waiting for us in the fridge. Maybe we'll make more cucumber juice?!
Subscribe to:
Posts (Atom)